Going Ahead!!

Here I am after such a long time!!!

So much time has passed, my life is completely changed now. Our childhood days are gone. Yeah we have grown up :). It was the month of April when I started thinking of what to do next????

When you are in the stage of finishing your bachelors, it means your head is under a big knife 😛

If you don’t think about your career now, then you have to pay a big cost. Thinking over it I decided to go to Australia for my masters. Days passed and I applied for the visa and on 14th of July I got my visa :). It was a happy moment,  but as we normally listen in our Bollywood Movies that “kuch paane k liye kuch khona bhi padta hai” means  that for getting something you have to lose something very precious. And here I have to leave my parents, my family, my friends. These are the most precious things in every person’s life. I got the ticket for 17 of July and I had to leave for the airport on 16th and i had only one day to shop. I packed my bags in a big hurry and reached here in Australia on 18th of July.

When a person comes from India, he/she has lots of dreams in his/her eyes for the future and they worry about their families too because you know once you go, you cannot come back easily or after few days, it took years to return to your homeland (and excited too to sit in the plane :P). Similar is the case with me. By reaching here, once I felt “kithe aa k fas gyi main” but thanks to GOD who has a plan for me and this plan is my MOM. She is also here with me to take care of my Sister’s son and it gives me a great sigh of relief :D. Love you Mom <3. Whenever I miss my family, she is always there to hold my hand and wipe my tears 🙂

So this is the story of reaching here!!!

In the next article I will tell you about Australia and its life style. So wait for it 🙂

Byee!!

Tabula Rasa!!!

Finally I am back!!

Writing my blog after so many days actually after 2 months.

Training over, Semester start. New subjects, new experience, new challenges.

An amazing fact of this semester is online attendance, which intends all the students to attend lectures.

In this session, I have five subjects named JAVA, .NET, Software Project Management, Data Warehouse and Environmental Science.

This last semester is gonna to be the toughest one. Lot of responsibilities and work load. Paying close attention to a tight schedule.

Encircled with a great deal of work, assignments, major project, MyReview, sessionals, EXAMS. OMG!!! It is laborious to manage all this. While attending lectures, lot of thoughts were running through my mind about these activities and only one solution I can see and that is “set priority”. For this I have made a time table but a big question mark ? HOW to strictly follow it?

Anyways atleast I have some idea about what to do 😛

I think its sufficient for today. Will come with some good article soon 🙂


Doxygen – Documentation Builder

Doxygen

Generate documentation from source code

Doxygen is a documentation generator, a tool for writing software reference documentation. The documentation is written within code, and is thus relatively easy to keep up to date. Doxygen can cross reference documentation and code, so that the reader of a document can easily refer to the actual code.

Doxygen supports multiple programming languages, in particular C++, C, C#, Objective-C, Java, Python, IDL, VHDL, Fortran and PHP. Doxygen is free software, released under the terms of the GNU General Public License.

Installation

Run following command in terminal:

$ sudo apt-get install doxygen

Usage

It’s very simple to use. Just type $ doxygen in terminal and you got its manual.

For using comments format is very important. So before start check its comment instructions.

To create documentation, move to folder where your source file exits through terminal and then type

$ cd /path/to/your/project/source/
$ doxygen -g [filename]

You can fill any filename as your choice. Its configuration file and you can edit that according your project details like change project name in filename.(config file for doxygen)

Then run

$ doxygen [filename]

By this your documentation will be generated. This will create 2 folders in your current directory.
Folders:

  • html for html documentation open /path/to/project/source/html/index.html to check documentation.
  • latex for documentation using latex as pdf output. For that file run

    $ cd /path/to/your/project/source/latex
    $ make

This will create refman.pdf file(check pdf file as file name may be changed in your case).

That’s all. This is basic guide, you can do more by exploring filename.conf file.
You can also add Special Commands in comments to make your documentation more descriptive.

Hope this will help you.

Upgrading Tiki from 11.0 to 12.0

Tiki 12.x LTS is the upcoming “Long Term Support” version. To upgrade Tiki from 11.x version to 12.x, just follow the simple  steps given below:

  1. Backup all the files and database from your current installation.
  2. Download the package of new version from this link:http://info.tiki.org/download#x_LTS
  3. Extract it and place it into your web directory.
  4. Change permissions of it using this command:
    $ chmod -R 777 foldername
  5. Now open the browser and write localhost/tiki-12.0 in the url and follow the steps for installation and click on continue.
  6. When it will ask for the database details, give the name of the previous database, it will overwrite it and the keep the previous details as such.
  7. Your Tiki will be upgraded to the latest version.

Cheers!!!

Web Application Frameworks

What is a framework?
A structure for supporting or enclosing something else, especially a skeletal support used as the basis for something being constructed.

Web Application Framework
A web application framework (WAF) is a software framework that is designed to support the development of dynamic websites, web applications, web services and web resources.

Need to use WAF
Types of framework Architectures
Three types of framework architecture is there. These are:
1. Model View Controller
2. Push-based vs Pull-based
3. Three Tier Organization

  1. Model View Controller:- MVC – Model View Controller. MVC is a type of architectural framework. M stands for Models –Models are considered data, it’s what holds and handles data. Think of a model like a giant attribute with several attributes forming it. In OOP attributes are what we use to define variables pertaining to that class. So the easy way to think of this is that a model is a giant variable that holds specific variables forming the details of that giant variable. View – View represents how the Controller displays the Model. The Controller manipulates the Model with methods and as such it passes the manipulated Model to the view with methods and the view will then display it properly. Controller : –  A controller is what performs the actions on a Model. In OOP something that performs an action is called a method. The simple way of thinking of a method is a function; a method is simply a function. The Controller’s job is to translate incoming requests into outgoing responses.
  2. Push-based vs Pull-based :- Most MVC frameworks follow a push-based architecture. These frameworks use actions that do the required processing, and then “push” the data to the view layer to render the results. Django, Ruby on Rails are good examples of this architecture. An alternative to this is pull-based architecture, sometimes also called “component-based”. These frameworks start with the view layer, which can then “pull” results from multiple controllers as needed. In this architecture, multiple controllers can be involved with a single view. Struts2, Lift, Tapestry, JBoss Seam, Wicket and Stripes are examples of pull-based architectures.
  3. Three Tier Organization :-The client, on web applications is a web browser that runs HTML generated by the application layer. The term should not be confused with MVC, where, unlike in three-tier architecture, it is considered a good practice to keep business logic away from the controller, the “middle layer”.

Features:-

  •  Caching
  •  Security
  •  Database excess, mapping    and configuration
  •  Url Mapping
  •  Scaffolding
  •  Ajax
  •  Web Services
  •  Web Resources

List of Web Application Frameworks
Screenshot from 2013-11-15 09:13:51

Top 5 open Source Web Application Frameworks

  1. Cakephp
  2. Django
  3. Ruby on Rails
  4. Codeigniter
  5. Symfony
  1. CakePHP :- CakePHP is a rapid development framework for PHP which uses commonly known design patterns like ActiveRecord, Association Data Mapping, Front Controller and MVC. The primary goal is to provide a structured framework that enables PHP users at all levels to rapidly develop robust web applications, without any loss to flexibility.
    Compatible with php4 and php5 both. CakePHP allows to write less code to achieve the same affect as other developers.
    It loves the open source community.
  2. Django :- Django is a free and open source web application framework, written in Python, which follows the model–view–controller architectural pattern. Django emphasizes reusability and “pluggability” of components, rapid development, and the principle of don’t repeat yourself.
    Some well known sites that use Django include Pinterest, Instagram, Mozilla,The Washington Times, and the Public Broadcasting Service.
    A lightweight, standalone web server for development and testing. A form serialization and validation system which can translate between HTML forms and values suitable for storage in the database. A template system that utilizes the concept of inheritance borrowed from object-oriented programming A caching framework which can use any of several cache methods.
    Support for middleware classes which can intervene at various stages of request processing and carry out custom functions.
  3. Ruby on Rails :- Ruby on Rails, often simply Rails, is an open source web application framework which runs on the Ruby programming language. It is a full-stack framework: it allows creating pages and applications that gather information from the web server, talk to or query the database, and render templates out of the box.Rails embraces change, while Django embraces stability. Which means that you get lots of new stuff with each Rails release, which come more frequently, while with Django you get a longer release cycle (historically) but have stronger backwards compatibility. In Rails programmer productivity is seen as more important.  Rails additionally increases productivity by offering scaffolding (generating code).
  4. CodeIgniter :- Code igniter is a commanding PHP framework. If we consider web applications with advanced features, then to create such an application Code igniter is one of the efficient PHP Frameworks. As it makes web application always ready, learning becomes easier. Also due to the usual PHP coding it makes the code portable and only because of this, compared to other frameworks, Code Igniter is significantly simple and fast. Its PHP based only and not very object-oriented in some parts
    Irregular releases. In short, when a framework with a small track, minimal design, outstanding performance, comprehensible documentation, variety of PHP versions and configurations is required, in such situations, Code igniter is the best option as in such a framework, use of command line and specific coding rules is not restricted.
    Thus, CodeIgniter Framework helps to develop rapidly, its own application which is very simple to handle and stout in functioning.
  5. Symfony :- Symfony is a PHP web application framework for MVC applications. Symfony is free software and released under the MIT license. Symfony has a low performance overhead used with a bytecode cache.
    Symfony is aimed at building robust applications in an enterprise context, and aims to give developers full control over the configuration: from the directory structure to the foreign libraries, almost everything can be customized.

That’s it.

Enjoy!!

View and Edit Client Profile in Automation

Today I added the client edit profile feature for client, now if there is some need to edit the user profile then one can search for the client and edit its profile.

Image

I really enjoyed this while doing, I am enjoying what I am doing but the time period is short now. I have lot of works to do in automation, but time is less. Hope I can finish it. Now I will do the editing of jobs from front end.

Setting up Django Debug Toolbar

Django Debug Toolbar is a very useful piece of django middleware which gives you a side panel displaying useful information about your app, including requests and sql queries.

Here is how I installed the django debug toolbar.

1. Open up your terminal and run:
sudo pip install django-debug-toolbar

2. Once you have that, now copy and paste the following into your django projects settings.py.

if DEBUG:
INTERNAL_IPS = (‘127.0.0.1’,)

3. Now add the package to the MIDDLEWARE_CLASSES in your project settings.py:

MIDDLEWARE_CLASSES += (
‘debug_toolbar.middleware.DebugToolbarMiddleware’,
)

The debug toolbar should be after any other middleware that encodes the response content, so it is best to place it last in the     middleware sequence.

4. Add the package to  INSTALLED_APPS in the project settings.py:

INSTALLED_APPS += (
‘debug_toolbar’,
)

5. Add the DEBUG_TOOLBAR_PANELS and DEBUG_TOOLBAR_CONFIG at the end of your settings.py file:

DEBUG_TOOLBAR_PANELS = (
‘debug_toolbar.panels.version.VersionDebugPanel’,
‘debug_toolbar.panels.timer.TimerDebugPanel’,
‘debug_toolbar.panels.settings_vars.SettingsVarsDebugPanel’,
‘debug_toolbar.panels.headers.HeaderDebugPanel’,
#’debug_toolbar.panels.profiling.ProfilingDebugPanel’,
‘debug_toolbar.panels.request_vars.RequestVarsDebugPanel’,
‘debug_toolbar.panels.sql.SQLDebugPanel’,
‘debug_toolbar.panels.template.TemplateDebugPanel’,
‘debug_toolbar.panels.cache.CacheDebugPanel’,
‘debug_toolbar.panels.signals.SignalDebugPanel’,
‘debug_toolbar.panels.logger.LoggingPanel’,
)

DEBUG_TOOLBAR_CONFIG = {
‘INTERCEPT_REDIRECTS’: False,
}

That’s it !!

Now fire up your project, and all being well, the django debug side panel should appear in the browser window. If this does not happen, the first thing to check is whether you have <body></body> tags in your html.

Debug toolbar appearance

debugger

Enjoy!! 😀

Coding Joy!!

Today I was regenerating the problem of Automation with some new small app. So I decided to do it by calculating tha area of rectangle,  so I made three tables, one table is taking the value of length, another is taking the value of breadth and on submitting these two tables are updated, and it will redirect to a new page where an option is appeared to “calculate the area” and it performed the process and update it into the third table. I did this to regenerate that problem, but it didn’t show any error like it was showing in automation. But I was enjoying my work. I enjoyed doing coding 😀 When I was seeing the output coming on screen , it was giving me some internal happiness. Although it was just a small thing but it really matters for me, whether I was unable to create that error, but I am satisfied with whatever I did as I have decided in the morning that today I will do this work and accomplish it. So happy days are here again!!
I wish that I continue doing work like this.

InnoDb and MyISAM

MySQL supports several different types of Table Engines also known as “Table Types”. A database can have its tables being a mix of different table engine types or all of the same type.

The two most commonly used on most Cloud Sites MySQL servers use Innodb and MyISAM engines.

MyISAM is the default table engine type for MySQL 5.0 but the Cloud Sites environment defaults the storage engine to Innodb. In other words Cloud Sites is partial to Innodb if you do not explicity specify your engine type in your table DDL. We have also tuned the database servers to generally perform best with using the Innodb Engine type.

MyISAM Vs InnoDb

  1. MyISAM is not ACID compliant and non-transactional while InnoDb is ACID compliant and hence fully transactional with ROLLBACK and COMMIT and support for Foreign Keys.
  2. MyISAM requires full repair/rebuild of indexes/tables while InnoDb requires auto recovery from crash via replay of logs.
  3. In MyISAM, no ordering in storage of data while in InnoDb, row data stored in pages in PK order.
  4. MyISAM supports table level locking while InnoDb supports row level locking.
  5. To maintain data integrity, InnoDB also supports FOREIGN KEY referential-integrity constraints while MyISAM does not check.

How to change your table Engine type from MyISAM to Innodb and vice-versa?

You do so by simply issuing the “ALTER TABLE” statement:

ALTER TABLE <table-name> ENGINE=INNODB;
ALTER TABLE <table-name> ENGINE=MyISAM;

  1. Log into the PHPMyAdmin utility.
  2. Select the database which contains the Table-Name
  3. Click on the SQL tab
  4. Paste in the query provided above. Be sure to replace table-name with the correct name of your table
  5. Click the GO button.

Tiki Wiki CMS Groupware

What is TikiWiki CMS Groupware?

Tiki Wiki CMS Groupware  is an Open Source Content Management software, that gives you the ability ,to create, edit, manage and publish web content in a consistently organized and efficient manner.

A full-featured, web-based, multilingual (40+ languages), tightly integrated, all-in-one Wiki+CMS+Groupware, Free Source Software (GNU/LGPL), using PHP, MySQL, Zend Framework, jQuery and Smarty(a template engine for PHP, facilitating the separation of presentation (HTML/CSS) from application logic. This implies that PHP code is application logic, and is separated from the presentation. Jquery is used to make the use of javascript easy). Tiki can be used to create all kinds of Web applications, sites, portals, knowledge base, intranets, and extranets.

Wiki:-– A website or database developed collaboratively by a community of users, allowing any user to add and edit content.

CMS:-

A content management system (CMS) is a system used to manage the content of a Web site. Typically, a CMS consists of two elements:

  • the content management application (CMA) and
  • the content delivery application (CDA).

The CMA element allows the content manager or author, who may not know Hypertext Markup Language (HTML), to manage the creation, modification, and removal of content from a Web site without needing the expertise of a Webmaster.

The CDA element uses and compiles that information to update the Web site. The features of a CMS system vary, but most include Web-based publishing, format management, revision control, and indexing, search, and retrieval.

As you can infer from the name, it’s a wiki: a collaborative bit of technology used to gather information, or an open source dictionary, if you will.  Wikipedia is probably the most popular wiki. However, albeit enormous in scope, Wikipedia is limited to what it does for the public.

Features:

1. Content Features: – ex: Articles, forums,Image gallery, survey, file gallery etc.
2. Navigation Features:- ex: Category, Modules,Menus, bookmarks.
3. Tranversal features:- ex: RSS- Really Simpe Syndication.
4. Text Area features:- ex: Wiki Plugins, wiki syntax, Copyirght, smiley
5. Administation features: ex: Permission,Theme control, edit css
6. Advanced features: ex: Integrator: Import an external html pages and Pluginsql: display selected queries.

Other features include a wiki engine, news articles, discussion forums, newsletters, blogs, file galleries, bug and issue trackers (form generator), polls/surveys and quizzes, banner management system, calendar, maps, mobile , RSS feeds, category system, tags, an advanced theming engine, spreadsheet, drawings, inter-user messaging, menus, advanced permission system for users and groups, search engine, external authentication, etc.

Why it is better than others?

1. Full featured CMS:- A software application used to upload, edit, and manage content displayed on a website.

2. Inherent synchronized releases :- All features have to be ready at the same time.

3. Tiki Wiki has more built-in features than any other Web applications but MediaWiki doesn’t offer forums, bug tracker, blogs, etc.

4. When Tiki is upgraded, all the features are supported and the upgrade is smooth. In MediaWiki, some of your plugins/extensions may have become abandoned or be incompatible with the new version.

5. In Tiki, you can attach files to a page or use the File Gallery feature.

6. Tiki Wiki uses a database, such as MySQL, DokuWiki uses files for storage whereas.

7. Tiki Wiki has features WordPress doesn’t have for example, a strong wiki engine.

8. With WordPress, some of your plugins/extensions may become abandoned or be incompatible with the new version, When Tiki Wiki is upgraded, all the features are supported and the upgrade is smooth. Tiki uses an all-in-one model that incorporates nearly every feature into the main code base. This design ensure
that upgrades are easy; because everything is released together, there is no fear that an enhancement or fix to one feature will break another.

Where it can be used?

TikiWiki takes the wiki one giant step further: TikiWiki has a feature set that looks like it belongs to a large-scale system. So we can use it for following purposes.

For writing:

Articles, Blog, Calendar, Charts, ChatContact, Directory, FAQ Featured, Links, File Gallery, Forum, Friendship Network, Gmap, HTML Page, Image Gallery, Live Support Map, Newsletter, Newsreader,Notepad, Personal content, Personal Messaging, Polls, Quizzes, Shoutbox, Slideshow, Spreadsheet, Tasks, Tracker (forms and database generator), User Files, Webhelp, Webmail, Wiki.

How It can be used?

1. Firstly we need to make an account. In admin account, we have all the facilities but in normal registered user only we can create tikiwiki page but can use other features also if we have permissions to do so.

2. Its admin interface looks like this:

interface

Configuring TikiWiki Features

To configure TikiWiki features:
1. Click Admin > Features (the Features page will appear).

features

2. Check the following features (Blogs, Image Galleries, Articles, Forums,
Surveys, Trackers, Calendar, RSS & Polls).
4. When you finished, click Apply.

Creating a TikiWiki Page

To create your first TikiWiki page:
1. Access your practice TikiWiki site.
2. Click Wiki>Create on wiki page.

wikipage

3. Give your new page some content by typing in the following: “I have
created a new page.”
4. When you have finished, click Save.

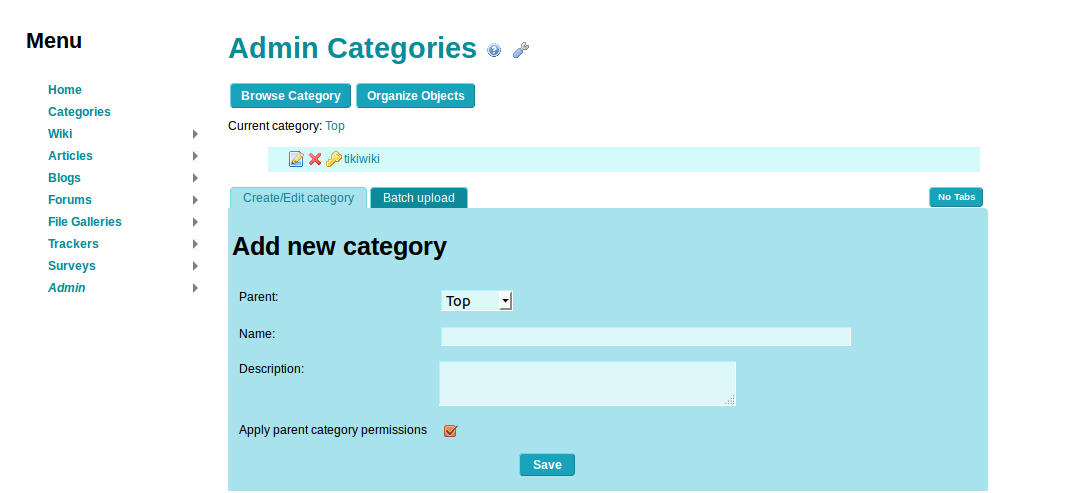
Creating a TikiWiki Category

Categories are ways of classifying TikiWiki objects (blogs, image galleries,
articles, polls, forums, wiki pages or file galleries). It is the ideal way of
organizing the content of your TikiWiki. You can define an unlimited,
hierarchically organized set of categories that can function like a table of
contents. Users can then browse (and find things quite easily) by categories.

To create a TikiWiki Category:
1. Click Admin > Categories.

categories

2. Select Top (or choose an existing parent category if you’re creating a
child category).
3. Enter My Category for your category’s name.
4. Enter “This is my tutorial category” as your description (if necessary).
5. Check Assign permissions automatically.
6. When you have finished, click Save.

Creating a Blog on TikiWiki

TikiWiki’s Blogs feature enables users to enjoy all the best features of
weblogs (including RSS output, trackback pings, and remote posting via
Blogger-compatible programs, such as w.bloggar), but without the hassle
(and, often, the expense) of using commercial blogging services.

To create a new blog:
1. Click Blogs > Create New Blog.

blog

2. Enter “My First Blog” as the title of your new blog.
3. Give a brief description of what your new blog will be about
4. Set the specific parameters you want for your new blog.
5. Click Save.

Similarly you can use another features too.

Enjoy!! 😀